Condenser leaks come in two distinct forms: refrigerant leaks that compromise your system's heat-transfer chemistry, and water/condensate leaks from drainage problems. They look similar from the outside but require completely different repairs. Getting the diagnosis wrong wastes money and time.
This guide covers how to identify which type of leak you have, walk through the right repair steps for each, decide between fixing or replacing your system, and know when a certified technician is the only safe path forward.
Key Takeaways
- A leaking condenser disrupts heat release, and even a small refrigerant undercharge can cut cooling capacity by nearly 13%
- Common signs: warm air from vents, hissing sounds, ice on refrigerant lines, puddles near the unit, or visible coil corrosion
- Condensate leaks (clogged drain lines) are often DIY-fixable — refrigerant leaks require an EPA-certified technician by law
- Use the $5,000 rule (age × repair cost) to decide repair vs. replace; ENERGY STAR flags units older than 10 years as replacement candidates
- Annual maintenance is your best defense against leaks in South Florida's corrosive climate
What Is an AC Condenser and Why Does It Leak?
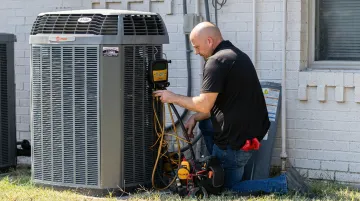
The outdoor condenser unit is where your AC releases heat. The Department of Energy defines it as the component that expels the heat absorbed from inside your home — hot, pressurized refrigerant flows through coils, the heat dissipates outside, and the cooled refrigerant circulates back indoors. In South Florida, that means essentially year-round operation with no off-season recovery time.
Two Types of Leaks — and Why They're Different
Homeowners encounter two distinct leak types that require completely separate responses:
- Refrigerant leaks — a breach in the sealed chemical circuit that makes cooling possible; loss of refrigerant means the system can't transfer heat effectively
- Condensate/water leaks — moisture drainage failures unrelated to the refrigerant circuit; typically caused by clogged drain lines, cracked drain pans, or frozen coils that melt and overflow
The repair path, cost, and who can legally perform the work are different for each. Misidentifying the leak type leads homeowners down the wrong repair path — and often a more expensive one.

Why Palm Beach County Systems Are Especially Vulnerable
Salt air accelerates corrosion faster than most homeowners expect. According to Carrier's coastal HVAC documentation, salt water droplets can travel up to 2 miles inland, with corrosion severity varying based on wind direction, humidity, and coil temperature. Combined with year-round operation and high humidity, Palm Beach area systems face corrosion conditions that simply don't apply in most of the country.
Signs You Have an AC Condenser Leak and What's Causing It
Condenser leaks show up in a handful of consistent ways. Matching the symptom to its root cause tells you what you're dealing with — and whether it's a DIY fix or a call to a certified technician.
Warm Air From Vents
Your system runs but can't cool the air — the most common sign of low refrigerant from a condenser coil leak. Research cited by DOE/ORNL found that even a slight refrigerant undercharge can reduce cooling capacity by nearly 13% and energy efficiency by 7.6%. A 50% undercharge can raise supply-air temperature by roughly 5°F.
Root cause: Corroded coil walls, pinhole leaks from formicary corrosion (copper tubing reacting with moisture and airborne VOCs from building materials or adhesives), or damaged refrigerant lines.
Hissing or Bubbling Sounds Near the Outdoor Unit
A hissing sound near the condenser indicates pressurized refrigerant escaping through a crack or loose fitting. Bubbling suggests refrigerant mixing with moisture inside the system — typically a sign of a more significant breach.
Root cause: Physical damage to coils, loose Schrader valves, or aging refrigerant line connections.
Ice Buildup on Coils or Refrigerant Lines
Low refrigerant pressure causes the remaining refrigerant to over-expand, dropping temperatures below freezing on the coil surface. If you see ice on the indoor evaporator coil or on the refrigerant lines, a leak is the likely cause (restricted airflow can compound it).
The underlying cause is a refrigerant leak that reduces system pressure below normal operating range.
Water Puddles or Oily Stains
- Clear water puddles near the indoor air handler → likely a clogged condensate drain line or cracked drain pan (DIY-appropriate)
- Oily residue or staining on or near the outdoor condenser → refrigerant oil escaping with the leak (requires a certified technician)
Visible Corrosion or Unusual Odor
Green or white deposits on copper tubing or the coil surface indicate active or developing corrosion. Some refrigerants also carry a faint sweet or chemical smell when leaking. Both are physical warnings that the coil integrity is compromised.
Long-term moisture exposure, salt air, and formicary corrosion are the primary culprits — and in South Florida, salt-laden coastal air accelerates this damage significantly. Newer construction is also at higher risk, since adhesives, paints, and building materials can off-gas organic acids that attack copper tubing over time.
How to Repair an AC Condenser Leak: Step-by-Step
Before touching anything, confirm which leak type you're dealing with. Refrigerant handling is federally regulated under the EPA Clean Air Act — only EPA Section 608-certified technicians can legally purchase, handle, and recharge refrigerants. Homeowners who handle refrigerants without certification risk civil penalties up to $124,426 under federal law.
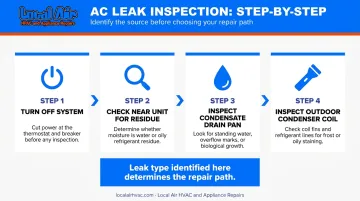
Step 1: Confirm the Leak Type
- Turn off the system at the thermostat and at the circuit breaker before any inspection
- Check what's near the unit — clear water points toward a condensate/drain issue; oily residue or staining near the outdoor coil points toward refrigerant loss; ice points toward refrigerant undercharge
- Inspect the condensate drain pan (under the indoor air handler) for standing water
- Inspect the outdoor condenser coil with a flashlight — look for oily discoloration, visible corrosion marks, or physical damage
The leak type you identify here determines everything that follows.
Step 2: Fixing a Condensate/Water Leak (DIY-Appropriate)
If the leak is clear water from the drain line:
- Locate the condensate drain line (PVC pipe exiting the indoor air handler)
- Attach a wet/dry vacuum to the exterior end to pull out the clog, or pour diluted white vinegar into the access port to dissolve algae buildup
- Check the drain pan for cracks — small cracks can be temporarily sealed with waterproof epoxy; a cracked pan is an inexpensive replacement part
- Confirm the pan is properly leveled so water drains toward the outlet, not pools in a corner
Stop and call a technician if: the water doesn't clear within 24 hours after flushing, or if water is pooling near any electrical components.
Step 3: Addressing a Refrigerant Leak (Professional Required)
A certified tech will use an electronic leak detector or UV dye kit to pinpoint the exact leak location. Once found, the repair options typically come down to two paths:
- Braze the leak — small, accessible pinhole leaks can sometimes be sealed this way
- Replace the coil — required when the leak is large, in a difficult location, or the coil has widespread corrosion
Older systems running R-22 face an added complication: production and import of that refrigerant ended January 1, 2020. Servicing them now requires recovered or reclaimed supply, which raises repair costs and limits availability — sometimes making full system replacement the more practical choice.
For Palm Beach area homeowners, Local Air HVAC and Appliance Repairs holds EPA Universal Certification and has been diagnosing and repairing refrigerant leaks in the region for over 20 years. Their technicians can confirm the leak source, advise on repair vs. coil replacement, and recharge the system correctly. Call 561-331-7633 to schedule a diagnosis.
Step 4: Straightening Bent Condenser Fins (DIY-Appropriate)
Bent aluminum fins on the condenser coil restrict airflow, forcing the unit to work harder and stressing coil connections over time. With power off:
- Use an inexpensive fin comb to straighten bent fins — work gently in the direction of the fin channels
- Clear debris from around the coil with a soft brush
- Rinse the coil from the inside out with low-pressure water — high-pressure washing bends fins further
Step 5: Test the Repair
After any repair, restore power and run the system for 15–20 minutes. Confirm:
- Cool air flows from vents
- The outdoor unit runs without hissing or abnormal noise
- No new puddles form near either unit
Monitor the system over the following 2–3 days. If symptoms return, the root cause wasn't fully addressed — that's the point to stop troubleshooting and call for professional assessment.
Fix vs. Replace: How to Decide
When a condenser leak quote lands in your inbox, the real question isn't just cost today — it's whether this repair buys you meaningful time or just postpones a larger bill.
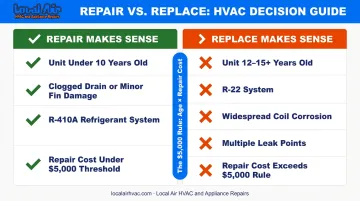
The $5,000 Rule
A widely used industry rule of thumb: multiply the unit's age (in years) by the estimated repair cost. If the result exceeds $5,000, replacement is typically the smarter financial move.
A concrete example: a 12-year-old unit with a $500 repair quote = $6,000 → lean toward replacement.
Note that no major regulatory or standards body (ENERGY STAR, DOE, AHRI) has formally published this formula — it's a contractor heuristic, not an official benchmark. Use it as a starting point, not a final answer.
When Repair Makes Sense
- The unit is under 10 years old
- The leak is a clogged drain line or minor fin damage
- The refrigerant is R-410A (still widely available)
- Repair cost falls comfortably under the $5,000 rule threshold
When Replacement Makes More Sense
- The unit is 12–15+ years old — ENERGY STAR recommends considering replacement for any AC more than 10 years old, with correctly installed high-efficiency equipment saving up to 20% on heating and cooling costs
- The system uses R-22 (costly to source since the 2020 phaseout)
- The coil has widespread corrosion or multiple leak points
- The repair quote exceeds the $5,000 threshold
- The system has needed refrigerant recharging more than once in the past two years
Repeated recharging without locating and sealing the actual leak isn't a repair — it's a temporary patch that lets refrigerant keep escaping and your energy bills keep climbing.
Preventive Maintenance to Avoid Future Leaks
For South Florida systems that run year-round, preventive maintenance is far cheaper than emergency repairs. Schedule professional AC service at least once a year — twice if your system runs heavily or sits near the coast.
Local Air's tune-up service covers refrigerant and electrical checks, coil inspection for early corrosion, condensate drain line clearing, fin cleaning, and a full performance inspection. To schedule, call 561-331-7633.
Three things homeowners can do between service visits:
- Keep 2 feet of clearance around the outdoor condenser — leaves, grass clippings, and debris trap moisture against the coil and accelerate corrosion
- Change air filters every 1–2 months — a dirty filter strains the system and can contribute to coil freezing
- Pour diluted white vinegar into the condensate drain access port monthly during heavy-use months to prevent algae blockage before it starts
For properties near the coast, ask your technician about coil coating treatments — electrostatic or epoxy coatings that form a protective barrier on the coil surface. Manufacturers like Carrier and Lennox both offer coastal-rated coil materials specifically engineered for salt-air environments. These treatments can significantly extend coil life in high-corrosion areas like Highland Beach or coastal Boca Raton.
Frequently Asked Questions
How much does it cost to fix a leaking AC condenser?
Costs vary widely by repair type. According to Angi's 2026 estimates, drain line clearing runs $75–$200 (often DIY-free), refrigerant leak repair ranges $250–$1,500, and a full condenser coil replacement runs $800–$3,000 nationally — South Florida pricing may differ. R-22 systems cost more due to reclaimed refrigerant supply constraints.
What is the most common cause of AC condenser leaks?
Corrosion is the leading culprit — particularly formicary corrosion, where copper coil tubing reacts with moisture and airborne VOCs from common building materials, creating microscopic pinhole leaks. For water leaks specifically, a clogged condensate drain line is by far the most common cause and usually the easiest to fix.
What is the $5,000 rule for air conditioners?
Multiply your unit's age in years by the repair estimate. If the result exceeds $5,000, replacement generally offers better long-term value than repair. This is an industry rule of thumb — use it alongside ENERGY STAR's guidance, which recommends considering replacement for units over 10 years old.
Can I fix an AC condenser leak myself?
Water leaks from clogged drain lines are DIY-friendly. Refrigerant leaks are not — federal EPA regulations prohibit uncertified individuals from purchasing, handling, or recharging refrigerants. Violations carry civil penalties up to $124,426. An EPA Section 608-certified technician is legally required for any refrigerant work.
How long does an AC condenser last?
ASHRAE's service-life database shows a 17-year median age at removal for residential split systems nationally, though ENERGY STAR suggests considering replacement after 10 years. In South Florida, salt air, high humidity, and year-round operation shorten that window — regular maintenance helps close the gap.
Is a leaking AC condenser dangerous?
Water leaks create mold risk if left unaddressed — the CDC notes that damp environments can cause respiratory irritation, coughing, and severe reactions in people with allergies or asthma. Refrigerant leaks carry direct health hazards including respiratory irritation and, in the case of R-22, documented cardiac and CNS symptoms in occupational exposure references. Both warrant prompt attention; refrigerant leaks require a certified professional.