A dryer failing to dry properly is one of the most common appliance complaints homeowners face. The good news: most causes follow predictable patterns, and many are fixable without calling anyone.
This guide covers the most common reasons a dryer stops drying effectively, a step-by-step troubleshooting process, guidance on repair versus replacement, and how to prevent the problem from coming back.
Key Takeaways
- Most drying failures trace back to a clogged lint trap, blocked exhaust vent, power issue, or failing heating component
- Start with the simplest checks — power, lint, and venting — before assuming a major part has failed
- Airflow problems are the most common cause — and a clogged vent is also a serious fire hazard
- If repair costs exceed 50% of a new dryer's price or your machine is over 10 years old, replacement often makes more sense
Why Your Dryer Isn't Drying: Common Causes
Most dryer failures fall into four categories. Identifying which one applies gets you to a fix faster than guessing.
Airflow and Venting Problems
Restricted airflow is the single most common reason a dryer heats but still leaves clothes damp. Two culprits cause this:
- Clogged lint trap — most people clean the screen but miss fine fiber buildup inside the housing slot itself. Vacuuming inside the slot monthly clears residue that silently chokes airflow.
- Blocked or kinked exhaust vent — moist air from the drum has nowhere to go, so clothes stay wet no matter how long the cycle runs. This is also a fire hazard. According to the NFPA, U.S. fire departments respond to an estimated 13,820 home structure fires involving dryers each year, with failure to clean identified as the leading contributing factor in 32% of those fires.
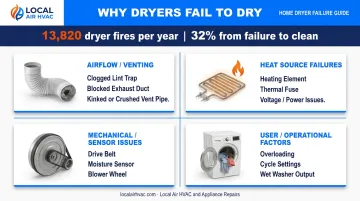
Heat Source Failures
If airflow isn't the issue, the heat source itself may be at fault. Three heat-related problems can cause a dryer to run without actually drying:
- Failed heating element — the dryer tumbles normally but produces zero heat
- Blown thermal fuse — a one-time safety device that cuts power to the heating system when the dryer overheats; it cannot reset and must be replaced
- Insufficient voltage (electric dryers) — electric dryers require a dedicated 240-volt outlet. If only one leg of the circuit is active, the dryer runs on 120V. Per GE Appliances, a towel load that normally takes 45 minutes can stretch to 3 hours under those conditions.
Gas dryers have one additional check: confirm the gas shut-off valve behind the appliance is fully open.
Mechanical and Sensor Issues
- Broken drive belt — the motor runs, but the drum doesn't spin. Clothes sit still and don't dry regardless of heat or airflow
- Faulty moisture sensor — dirty or failed sensor strips cause the dryer to cut the cycle short before clothes are actually dry. Wiping the strips with rubbing alcohol is a quick first test.
- Blower wheel failure — if the blower wheel is clogged or damaged, heated air can't circulate through the drum or exhaust through the vent properly
User and Operational Factors
Not every drying problem is mechanical. These non-repair causes are worth ruling out first:
- Overloading the drum blocks air circulation and significantly extends dry time
- Incorrect cycle selection — Timed Dry may not account for load size; Auto/Sensor Dry is generally more reliable
- Clothes coming out of the washer too wet — if the washer's spin cycle is underperforming, even a healthy dryer will struggle
How to Troubleshoot and Fix Your Dryer Step by Step
Start with the simplest checks first — most dryer problems get resolved before you ever need to open the machine.
Step 1: Confirm Power and Basic Settings
- Check that the dryer is firmly plugged in and seated in the outlet
- Inspect the circuit breaker — a tripped breaker is a common and easy miss
- For electric dryers: verify the outlet is 240V, not a standard 120V household outlet
- For gas dryers: confirm the shut-off valve behind the appliance is fully open
- Review the cycle setting — switch to Auto/Sensor Dry if Timed Dry isn't completing fully
Step 2: Clean the Lint Trap and Inspect the Vent System
Clean the lint screen after every load. Wash it with warm soapy water periodically — fabric softener residue clogs the mesh even when the screen looks clean.
Then check the exhaust vent:
- Inspect the vent hose behind the dryer for kinks, crushing, or disconnection
- Use rigid or heavy-gauge flexible metal ducting at a minimum 4-inch diameter — Whirlpool's venting specifications explicitly prohibit plastic or foil-type flex duct, noting both collapse easily and trap lint
- Check the exterior vent cap to confirm it opens freely and isn't blocked by debris or nesting
Step 3: Address Load Size and Washer Output
Fill the drum to no more than three-quarters capacity. Air needs room to circulate around the clothes, not just through a packed mass.
If clothes are coming out of the washer soaking wet rather than damp, the washing machine's spin cycle may be failing — that's a separate issue to address, but it will defeat even a fully functional dryer.
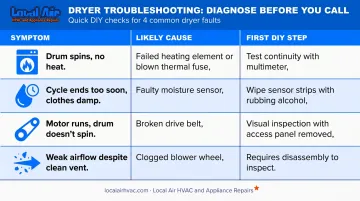
Step 4: Diagnose and Repair Internal Components
If airflow and power checks pass, the problem is likely inside the machine. Here's what each failure looks like:
| Symptom | Likely Cause | First DIY Step |
|---|---|---|
| Drum spins, no heat | Failed heating element or blown thermal fuse | Test for continuity with a multimeter |
| Cycle ends too soon, clothes damp | Faulty moisture sensor | Wipe sensor strips with rubbing alcohol |
| Motor runs, drum doesn't spin | Broken drive belt | Visual inspection with access panel removed |
| Weak airflow despite clean vent | Clogged or damaged blower wheel | Requires disassembly to inspect |
These repairs involve electrical disassembly. If you're not comfortable working inside the appliance, call a technician to handle diagnosis and replacement safely.
Thermal fuse warning: a blown fuse is almost always caused by a prior vent blockage. Replace the fuse without clearing the airflow restriction and it will blow again.
Step 5: Test and Validate After the Fix
Run a full cycle with a mid-sized load and check clothes for complete dryness. Listen for rattling, squealing, or humming — these can signal secondary issues beyond the original complaint.
If drying improves but isn't fully restored, schedule a professional inspection before a minor fault becomes a failed component.
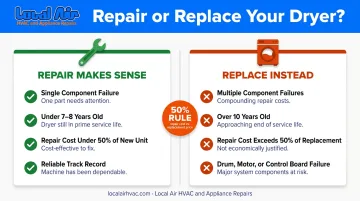
When Should You Fix vs. Replace Your Dryer?
The 50% rule is the standard benchmark: if repair costs exceed 50% of the price of a comparable new dryer, replacement is the smarter financial move. HomeAdvisor and Angi both cite this as the practical threshold.
Repair makes sense when:
- The problem is a clogged vent, lint trap, or setting error (zero cost to fix)
- A single component has failed — thermal fuse ($80–$150 total), drive belt ($100–$200), or moisture sensor ($10–$30 in parts) — and the dryer is under 7–8 years old
- The machine has otherwise been reliable
Replace when:
- The heating element plus additional components have failed together
- The dryer is over 10 years old — NAHB data puts average lifespan at 13 years, so repairs on aging units rarely pay off
- The drum, motor, or control board needs replacement
Common Mistakes to Avoid
Three mistakes account for most repeat failures after a dryer repair:
Treating the symptom, not the cause. Replace a blown thermal fuse without clearing the vent blockage that caused it, and the new fuse will blow again — usually within a few cycles.
Skipping the post-repair test. Run a complete cycle before calling the job done. A partial fix is easy to mistake for a full one until the next load.
Using incompatible replacement parts. Generic or off-brand parts may not meet the dryer's electrical or heat specifications, creating both safety risks and repeat failures. Always use OEM or verified-compatible components.
Avoiding these three errors after any repair will save you from cycling through the same problem twice. If the root cause isn't clear, a professional inspection is faster and cheaper than a second failed fix.
How to Prevent Dryer Drying Issues in the Future
Prevention here isn't complicated. A few consistent habits handle most of the risk.
Daily and monthly lint maintenance:
- Clean the lint screen after every single load
- Vacuum inside the lint housing slot monthly — a narrow vacuum attachment reaches the residue the screen misses
- This one habit does more for dryer performance and fire safety than anything else
Annual professional vent cleaning:
The NFPA recommends cleaning the vent at least once a year, or more often if clothes are taking longer than normal to dry. Professional cleaning removes buildup deep in the vent line that homeowners can't access with standard tools — and that buildup is exactly what causes fires and wasted energy.
If you're in the Boca Raton or South Palm Beach County area, Local Air HVAC and Appliance Repairs handles professional dryer vent cleaning for homes and businesses throughout the region. Named Best Appliance Repair in Royal Palm Beach for 2024, they clear the deep-line buildup that DIY tools can't reach. Call 561-331-7633 to schedule.
General maintenance habits:
- Avoid consistently packing the drum — leave room for air to move
- Mix fabric weights when possible to promote even drying
- Check the vent hose behind the dryer periodically, especially after the appliance has been moved or reinstalled
Frequently Asked Questions
Why is my dryer not getting clothes dry?
The most common causes are a clogged lint trap, blocked exhaust vent, or a failing heating element. Start with airflow — most drying problems trace back to restricted airflow and clear up once the blockage is removed.
Why is my dryer taking 3 cycles to dry?
Needing multiple cycles almost always points to restricted airflow from a clogged vent or lint trap, or an underperforming heating element. Address either issue promptly — both drive up energy bills and increase fire risk the longer they go unresolved.
How often should I clean my dryer vent?
At least once a year, per NFPA guidelines — more frequently if you're doing heavy laundry volume. A dirty vent is both a performance problem and a fire hazard, and professional cleaning reaches buildup that DIY cleaning can't.
Can a blown thermal fuse stop my dryer from heating?
A blown thermal fuse completely cuts heat to the dryer and cannot be reset — it must be replaced. The underlying cause (usually a blocked vent) must also be fixed, or the new fuse will blow again.
Is it safe to keep using a dryer that isn't drying properly?
If the root cause is a blocked vent or overheating components, continued use increases the risk of a dryer fire. It's not safe to keep running the appliance until the underlying problem has been identified and fixed.
Should I repair or replace my dryer if it keeps failing to dry clothes?
If repair costs exceed 50% of a comparable new dryer's price — or the unit is over 10 years old with recurring failures — replacement is the better investment. A single low-cost fix on a younger machine makes sense; repeated repairs on an aging dryer usually don't.