Cleaning them is possible. But the approach matters enormously. Flex duct liners are thin, and the same material properties that make them easy to route through a house make them easy to damage during cleaning. Use the wrong tools, and you're looking at torn liners, collapsed sections, or contaminants pushed further into the system rather than extracted from it.
This guide covers what flex duct cleaning actually involves — the correct process, the common mistakes, when to call a professional, and when replacement makes more sense than cleaning.
Key Takeaways
- Flexible ductwork can be cleaned, but requires gentler methods than rigid metal ducts
- The correct approach uses negative pressure vacuuming and soft agitation tools; stiff brushes will damage the liner
- Cleaning is appropriate when ducts are structurally intact with light-to-moderate dust buildup
- Professional service is strongly recommended — DIY attempts frequently tear or collapse the inner liner
- South Florida's heat and humidity accelerate moisture buildup inside flex ducts, raising mold risk — inspect annually at minimum
What Are Flexible Air Ducts and Why Do They Need Special Cleaning Care?
Flexible air ducts are lightweight, bendable tubes built in layers: a thin inner liner (typically double-ply polyester or aluminized material), a wire helix coil that maintains shape, fiberglass insulation, and a protective outer jacket. Manufacturers like Hart & Cooley, ATCO, and Dundas Jafine follow this general layered construction, with R-values typically ranging from R-4.2 to R-8.
Why the Interior Causes Problems
Unlike smooth sheet metal duct interiors, flex duct liners have a corrugated, ridged surface created by the wire coil underneath. That ribbed geometry makes flex duct bendable , but it also creates dozens of small grooves along every linear foot where dust, lint, pet dander, and debris settle and accumulate.
The liner itself is thin — double-ply polyester, aluminized polyester laminate, or a similar light material depending on the product. It handles airflow fine under normal conditions.
What it wasn't designed for is physical scrubbing, stiff brushes, or aggressive contact from cleaning tools.
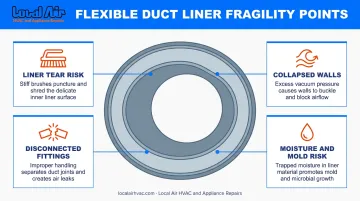
Key fragility points to understand:
- The liner can tear if contacted by rigid or stiff cleaning brushes
- Concentrated suction in one section can collapse duct walls inward
- Disconnected fittings are common in older flex duct installations and cleaning can worsen them
- Moisture trapped in the liner or insulation layer creates conditions for mold that cleaning alone may not resolve
Flex duct cleaning methodology must differ from standard metal duct cleaning for all these reasons. The EPA notes that for accessible flex duct sections, replacement is sometimes more economical than cleaning.
Signs Your Flexible Air Ducts Need Cleaning
There's no fixed cleaning schedule for ductwork. According to NADCA's ACR Standard, cleaning should be triggered by actual system conditions — not arbitrary timelines. The EPA similarly states that duct cleaning hasn't been shown to prevent health problems and should only be considered when specific conditions are present.
Clean or inspect your flex ducts when you notice:
- Visibly dusty supply vents or grilles
- Musty or stale odors when the HVAC system runs
- Reduced airflow from certain registers
- Dust resettling on furniture unusually quickly after cleaning
- Evidence of pests or vermin in the ductwork
- Post-renovation debris (drywall dust, insulation particles) in the system
The Florida Humidity Factor
South Florida adds a complication that most national guides don't account for. Palm Beach County sits in Climate Zone 1A — a warm-humid designation — and NOAA engineering weather data shows the region averages over 6,000 hours per year where wet-bulb temperatures reach or exceed 67°F.
Cold supply ducts running through hot, humid attics create significant condensation risk on duct surfaces. Research from the Florida Solar Energy Center confirms that buried or attic ducts in this climate have elevated potential for exterior condensation, which can wet surrounding materials and support mold growth.
The Florida Department of Health recommends keeping indoor humidity below 60% (ideally below 50%) to prevent mold — a threshold that's genuinely difficult to maintain in South Florida without a well-functioning HVAC system.
If your ducts show visible moisture staining, musty odors, or any sign of mold, don't attempt a standard cleaning. Get a professional assessment first — some affected sections may need replacement rather than cleaning.
How to Clean Flexible Air Ducts: Step-by-Step
The core principle here: pull debris out, don't scrape it out. Controlled negative pressure and gentle agitation — not physical contact — is what makes flex duct cleaning work.
Step 1: Inspect Before You Touch Anything
Use a flashlight or a camera inspection tool to examine accessible duct sections. You're looking for:
- Visible dust buildup along the interior
- Sagging, kinked, or collapsed sections
- Disconnected joints or loose fittings
- Tears or punctures in the liner
- Signs of moisture, staining, or mold
This step is not optional. Cleaning a duct that's already torn, disconnected, or moisture-affected doesn't restore it — it can spread contaminants or worsen structural damage. If sections need repair or replacement, address those first.
Step 2: Shut Down the HVAC System
Turn off the system at the thermostat and at the breaker. The system must not cycle on during cleaning. Seal off registers and grilles in sections not being actively cleaned using plastic sheeting or register covers, which concentrates suction where it's needed.
Step 3: Establish Negative Pressure
Connect a high-powered HEPA vacuum (truck-mounted or commercial-grade portable) to the main duct trunk or a central access point. NADCA's ACR Standard requires that the system stay under continuous negative pressure throughout cleaning, with vacuum equipment running without interruption to capture dislodged debris before it reaches the living space.
Any vacuum exhausting indoors must use HEPA filtration rated at 99.97% efficiency at 0.3 microns. Standard shop vacuums fall short on both suction capacity and filtration performance.
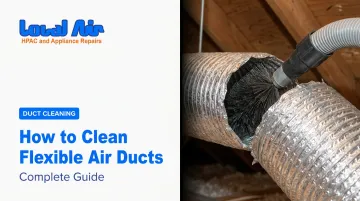
Step 4: Agitate Gently
Use soft-bristled rotary brushes, air whips, or compressed-air agitation tools to dislodge dust from the corrugated ridges. Always work in the direction of airflow toward the vacuum collection point.
NADCA's ACR Standard explicitly states that mechanical cleaning of flex duct liners must not create abrasions, breaks, or tears. Air-driven agitation tools are preferred over contact brushes because they dislodge debris without sustained pressure on the liner wall.
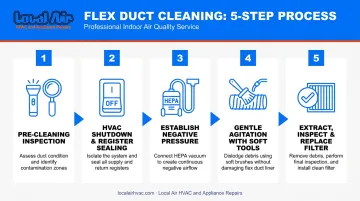
Step 5: Extract and Inspect
Work systematically: start at the farthest register back toward the main unit. After completing each section, do a visual check to confirm debris has been extracted and duct connections remain secure. Before restarting the system, replace the HVAC air filter.
Common Mistakes That Can Damage Flexible Ductwork During Cleaning
Most flex duct cleaning problems come down to using the wrong tools or skipping critical steps. Here are the most damaging errors to avoid:
- Using rigid brush heads designed for metal ducts. These can puncture the thin liner, and a torn flex duct section may need full replacement.
- Skipping the pre-cleaning inspection. Cleaning a duct that's already damaged, sagging, or moisture-affected wastes effort at best — and at worst spreads mold or collapses the duct entirely.
- Uncontrolled suction without section sealing. Concentrated negative pressure can collapse duct walls inward, permanently restricting airflow.
- Cleaning only the ducts and ignoring the rest of the system. NADCA standards require cleaning all components — coils, drain pan, blower motor, registers, and air handler — because contaminated components will recontaminate clean ducts quickly.
DIY vs. Professional Flexible Duct Cleaning
DIY cleaning of rigid sheet metal ducts is risky enough. For flex duct, the risk profile is higher.
What DIY Can't Replicate
The gap between professional and consumer-grade cleaning isn't just about equipment power — it's about the whole process:
| What Professionals Bring | Why It Matters |
|---|---|
| Truck-mounted or commercial HEPA vacuum | Required suction capacity and filtration |
| Flex-duct-safe agitation tools | Avoids liner damage |
| Systematic section-by-section negative pressure | Prevents cross-contamination |
| Pre-cleaning inspection | Identifies damage before it worsens |
| Post-cleaning verification | Confirms extraction was complete |
The EPA is direct on this point: inadequate duct cleaning can release more dust and contaminants into the home than if the ducts were left alone. Without proper vacuum capacity and section isolation, that's the probable outcome — not a worst-case scenario.
When Professional Service Is Non-Negotiable
- After home renovations that generated significant dust or debris
- When there are visible signs of mold or persistent musty odors
- When airflow is noticeably reduced and cleaning hasn't been done in several years
- Any time moisture damage is suspected
For homeowners in South Florida, all of these situations are more common than in drier climates. Heat and humidity accelerate liner degradation, encourage mold, and stress the entire duct system year-round.
What It Costs
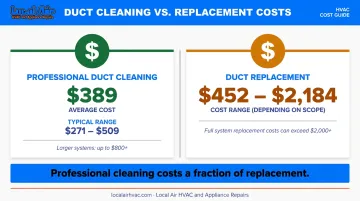
According to Angi's 2026 pricing data, professional residential air duct cleaning averages $389, with a typical range of $271 to $509. Larger or more contaminated systems can reach $800 or more. Compare that to ductwork replacement, which Angi puts at $452 to $2,184 depending on scope — and the case for getting the cleaning done right the first time is clear: professional cleaning costs a fraction of what replacement does.
That cost context matters for South Palm Beach County homeowners in particular. Local Air HVAC and Appliance Repairs has served the area for over 20 years with EPA Universal Certification, and their duct cleaning service is built around the specific contamination challenges Florida homes face — from everyday dust to the moisture-related issues that most national guides don't account for.
Frequently Asked Questions
Frequently Asked Questions
Can duct cleaning be done on flexible ductwork?
Yes, flexible ductwork can be cleaned, but it requires gentler methods than rigid metal ducts. The correct approach uses negative pressure vacuuming and soft agitation tools — stiff brushes or high-contact equipment can damage the liner.
How often should flexible air ducts be cleaned?
There's no fixed schedule. NADCA recommends cleaning based on actual conditions — visible contamination, airflow problems, post-renovation debris, or signs of mold — rather than set schedules. Inspect every few years and clean when conditions warrant it.
Can I clean flexible air ducts myself?
DIY cleaning isn't recommended for flex ducts. Household vacuums lack the suction and filtration required, and improper tools can easily tear the liner. Professional service is the safer and more effective choice.
How do you remove mold from flex ducts?
Mold in flexible ductwork should always be handled by a professional. The EPA notes that fiberglass liner contaminated with mold cannot be effectively cleaned. NADCA's ACR Standard recommends replacing porous materials with significant mold growth rather than cleaning them.
How long does flexible ductwork last?
Hart & Cooley warrants its flex duct products for 10 years against defects in materials and workmanship. Actual service life varies by installation quality, maintenance, and climate. In humid South Florida environments, ducts that aren't properly maintained may degrade faster.
When should flexible ductwork be replaced instead of cleaned?
Replacement is the better call when ducts are torn, collapsed, heavily moldy, or showing signs of significant liner degradation. A professional inspection can determine whether cleaning will restore function or whether replacement is the more practical long-term solution.